In previous posts for this reporting series, we learned about Report Types and Formats, and three specific types of Report Formats – Tabular reports, Summary reports and Matrix reports. Today, we will be creating the last type of Report Format in Salesforce – a Joined Report.
What is a Joined Report?
Joined Reports are unique – they look different than the other Report Formats we’ve reviewed because they allow us to combine data from multiple different report types, known as “blocks.” Joined Reports can have up to 5 blocks. However, each block must have a relationship with the same object or objects to be added into the same Joined Report. The initial or base report in a Joined Report, is also referred to as the Principal report.
Considerations for Joined Reports
Report Charts, Formulas and Cross-Object Formulas are supported with Joined Reports; however, Joined Reports cannot utilize Bucket Fields or be used as the base report for Dashboards.
**Bucket Fields, Report Charts, and Dashboards will be covered in a later part of this reporting series.
How to Create a Joined Report in Salesforce
In the previous report blog post, we looked at the count and amount of Opportunities by Lead Source and Type. Now, the question we need to answer is, “For Accounts that have Opportunities with a ‘Partner’ Lead Source, how many also have Open Cases?”
To report on this information, we need to use a Joined Report to show both Opportunity information and Case information since we don’t have an individual report type that can provide all of this information to us as the moment.
In our below example, our Principal report for the Joined Report will be the same report type as our previous blog post – the Opportunities report type. Then we will add a block from a different report type, Cases, that can provide the additional Case information we need to include in our Joined Report.
Note: To follow along with the steps below, use or create a Playground from Salesforce Trailhead or a Developer Edition org.
(If you are creating your Joined Report by starting from the Matrix Report from the prior reporting series part 4 post, skip to step 9.)
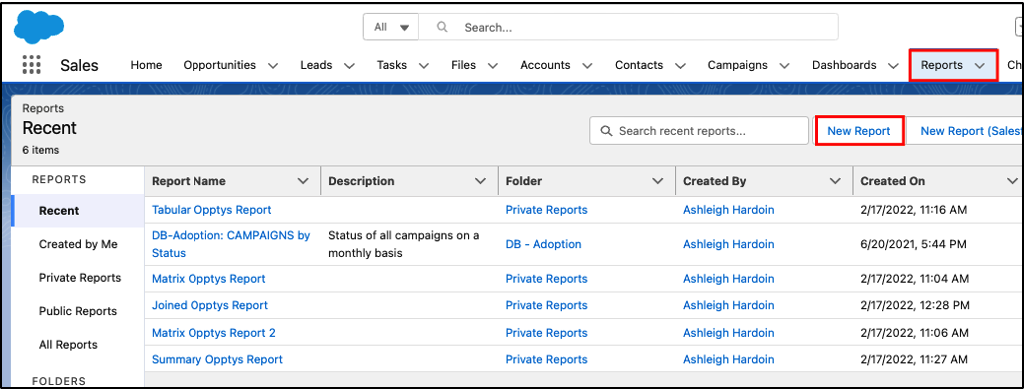
- In Salesforce, navigate to the Reports tab, and click New Report.
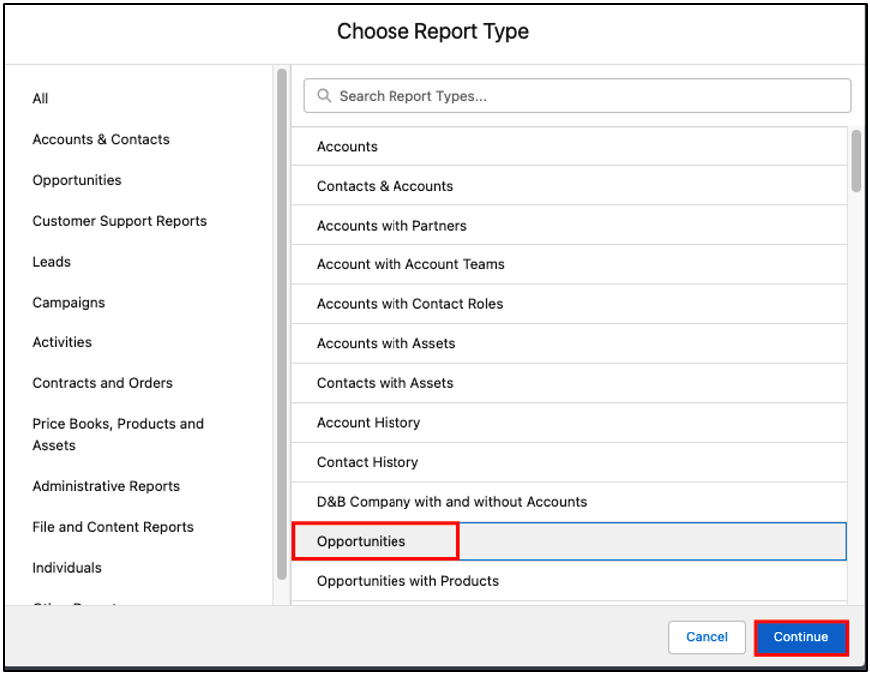
- Select the Opportunities Report Type, and click Continue.
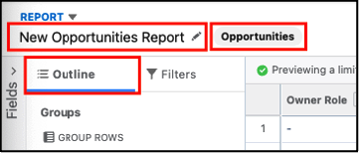
- Notice that when the report generates, the Report Type and Report Name display above the outline. The actions are located at the top right of the report.

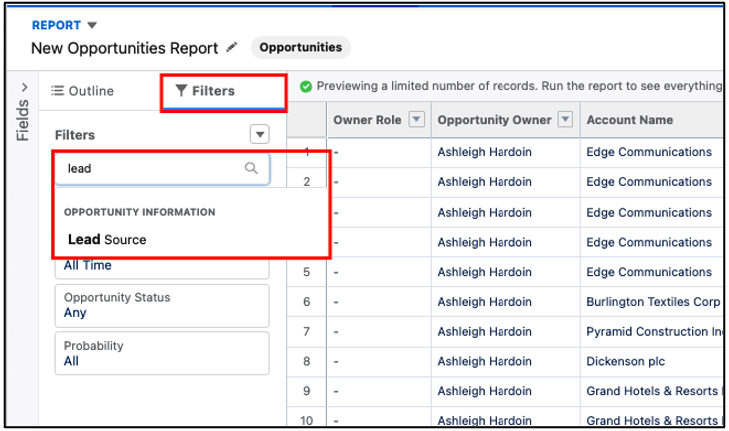
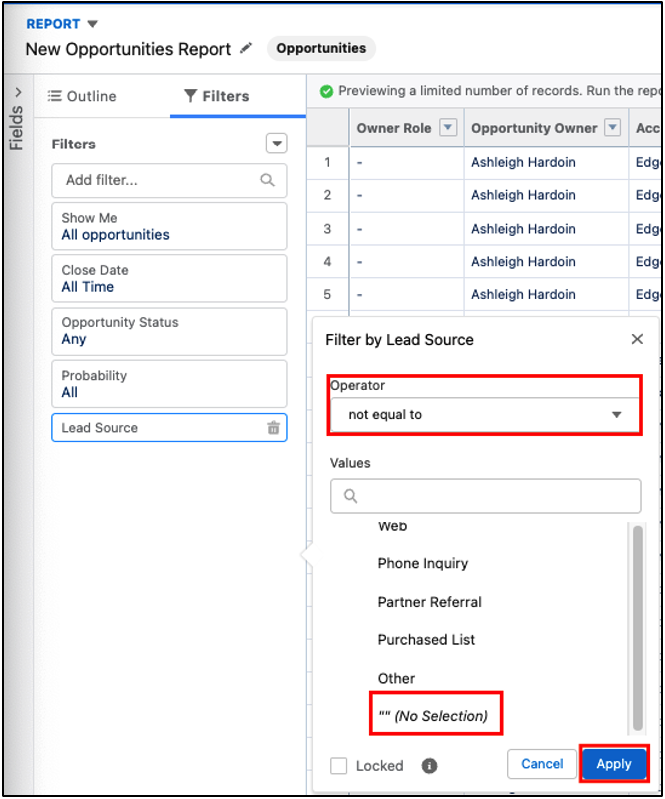
- Let’s update the Close Date to All Time. Next, we are going to add the Lead Source as a Report Filter since we want to see all Opportunities that include a Lead Source. To do this, click on the Report Filters tab, search for the Lead Source field in the search bar, and select it.
- Filter the Lead Source field so that undocumented values (aka blank values) don’t show by changing the Operator to not equal to and selecting the blank, “” (No Selection) value from the list. Click apply to save this filter.
- Next, navigate back to the Report Outline to select the data that should be included in our report.
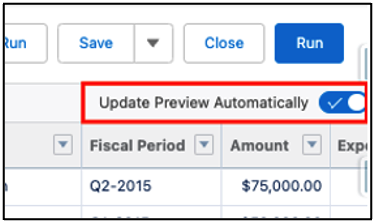
- Toggle the Update Preview Automatically to on. Now, the Columns in the Report Outline match the columns in the report preview. Additionally, the preview updates in real-time when columns are added or removed.
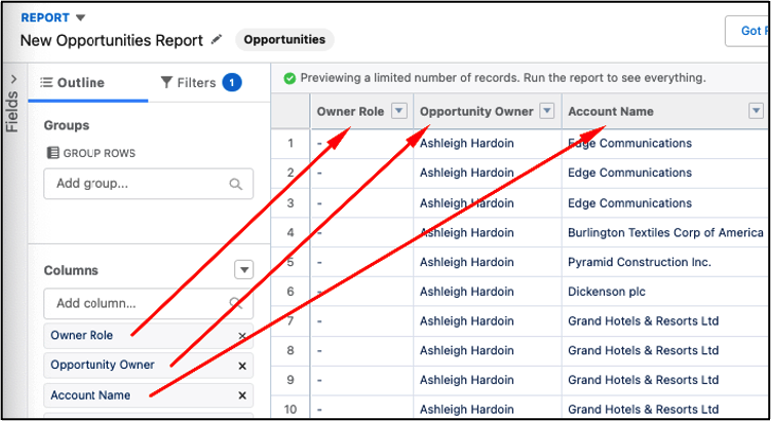
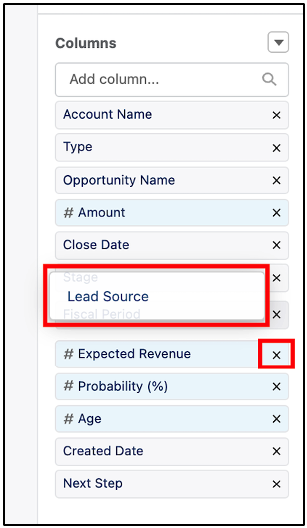
- Drag and drop Columns in the Outline to reorder them, and click the X on the Columns that we want to remove from the report. Update the Columns on this report to the following order and remove the rest: Account Name, Type, Opportunity Name, Amount, Close Date, Lead Source.
Update the Report Format to Joined Report
- Now that we have the principal report in Salesforce started, we can make a few more changes to create the Joined Report. First, update the Report Format to a Joined Report – click the down arrow on the ‘Report’ header, select ‘Joined Report,’ and click Apply.
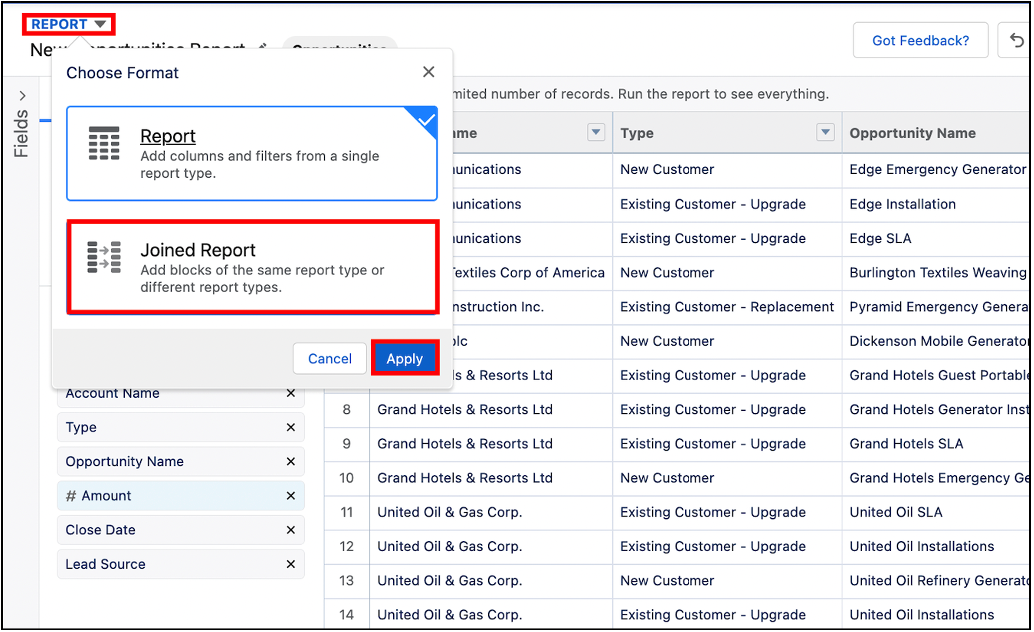
- Now, some key changes are visible with the Salesforce Joined report format:
- The report header has now changed to ‘Joined Report’
- Another report block can be added with the ‘Add Block’ button
- Information can be grouped across blocks
- The columns are now separated by report blocks with the Report Type and block number of that Report Type as a reference to the individual blocks
- The report preview has been updated to also include the Report Type and block number of that Report Type as a reference to the individual block
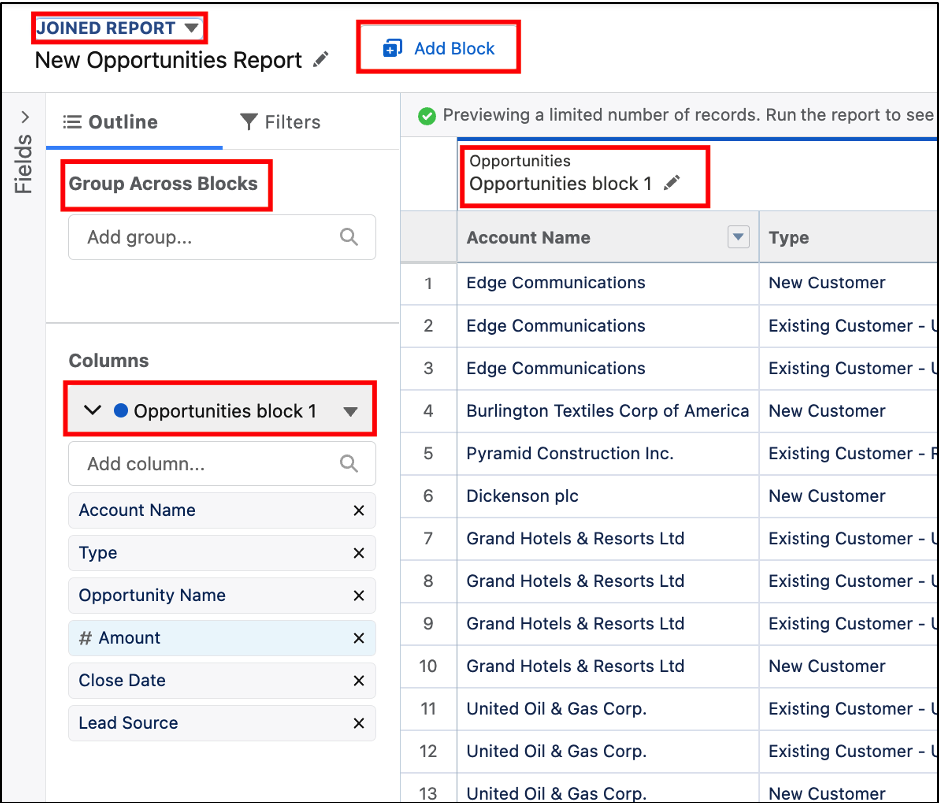
Note: If you skipped to this step as a continuation of the previous part 4 blog post, move the Lead Source and Type columns from the Group Across Blocks section to the Opportunities block 1 section by typing each column name in the Add column search box of the Opportunities block 1. The order of the columns will be clarified in a later step.
Add a Block to the Joined Report
- Next, add another block to the report by clicking the Add Block button. From here, select the Cases report type for the new report and click Add Block.
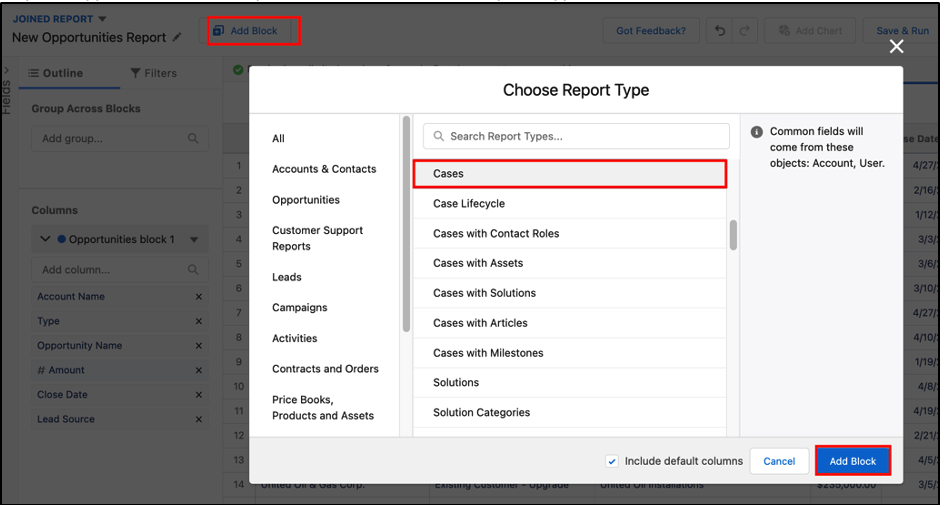
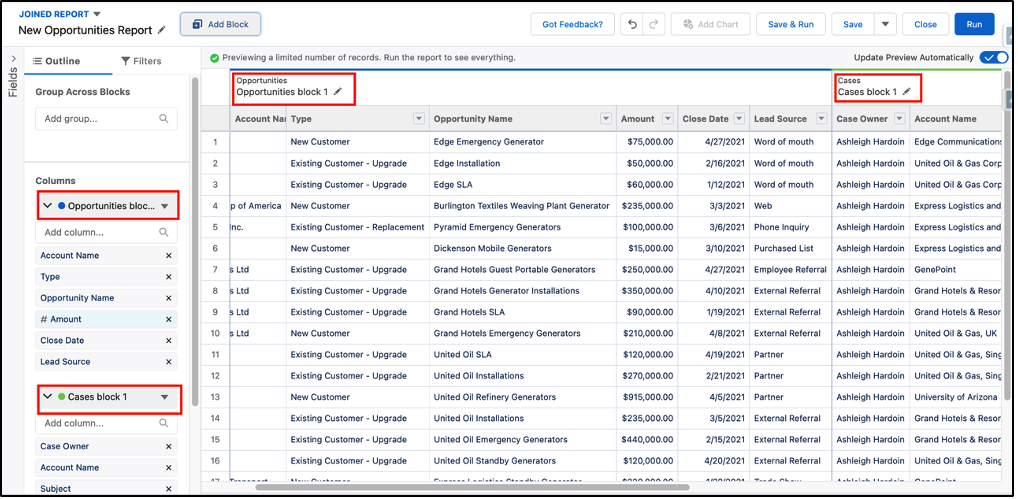
- Notice that separate information is visible for each report block in the columns and headers of the report previews. The report columns and headers are also color-coded to help users discern where the individual report columns can be previewed for each report block.
Update Filters and Outline
Now, update the report Filters and Outline to help answer our question: “For Accounts that have Opportunities with a ‘Partner’ Lead Source, how many also have Open Cases?”
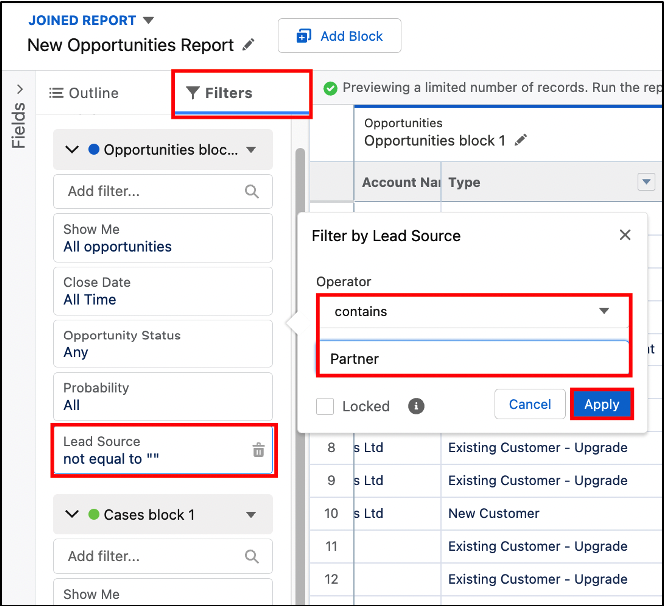
- In the report Filters section, we’ll update the Lead Source information for the Opportunities report block first by clicking on the Lead Source filter, then updating the Operator to contains, entering Partner, and clicking Apply.
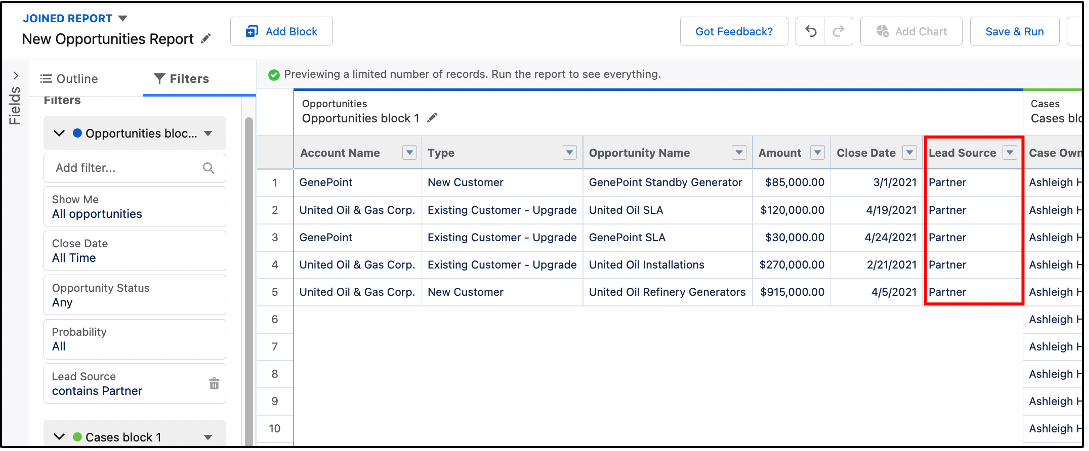
- In the report preview, the first report block now only shows Opportunities with ‘Partner’ as the Lead Source.
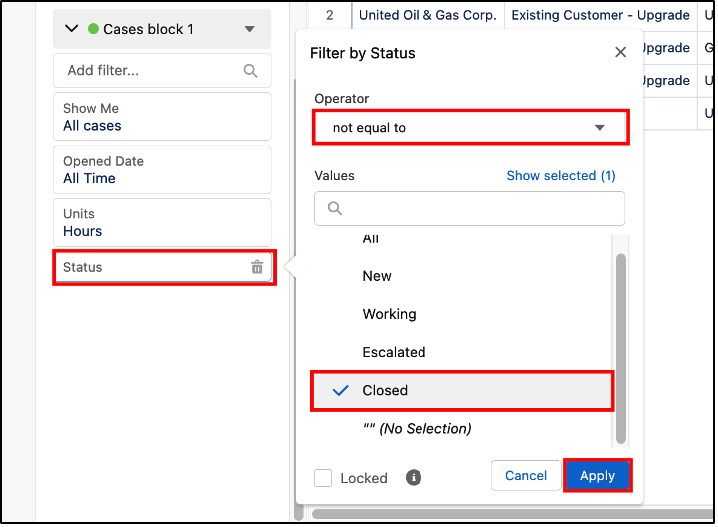
- Next, update the Cases report block so that only Open cases are displayed by adding the Status filter, updating the Operator to not equal to, selecting Closed, and clicking Apply.
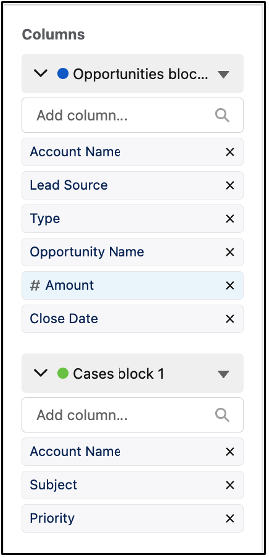
- Under the report Outline, update the columns for the Opportunities report block so the Lead Source is the second column. Update the columns for the Cases report block to the following and remove the other columns: Account Name, Subject, and Priority.
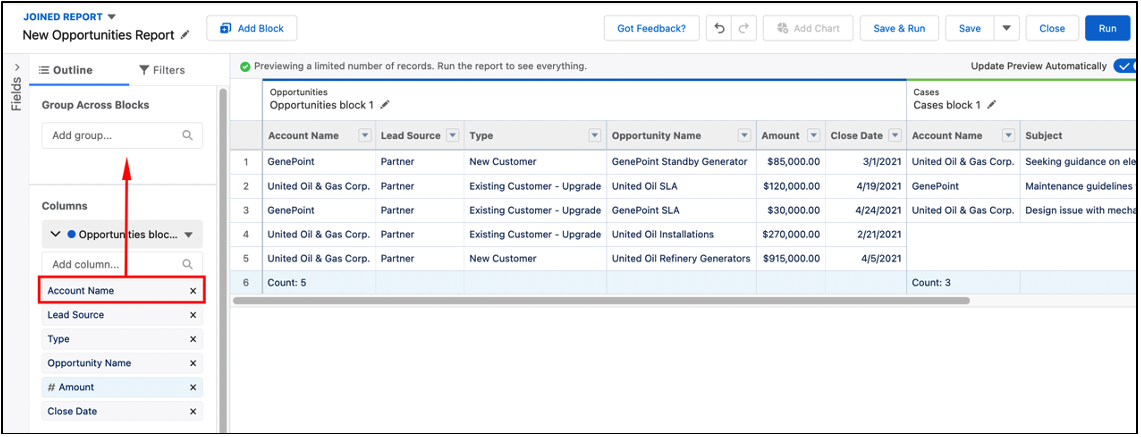
- In the report preview, the Opportunities and Cases with the same Account Names, don’t line up. To fix this, drag and drop the Account Name column from one of the report blocks into the Group Across Blocks section. This groups both reports by the Account Name and aligns the displayed information.
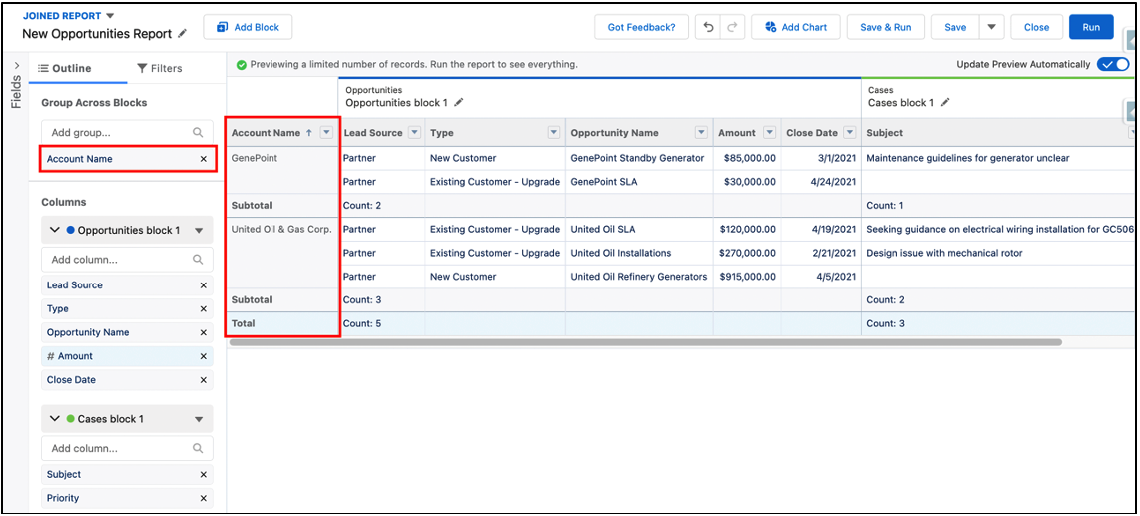
- Now, the Opportunities and Cases are grouped by Account Name for both reports.
Save the Report
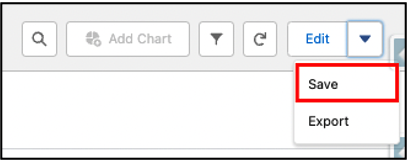
- In the top right corner of the report, click the Save button.
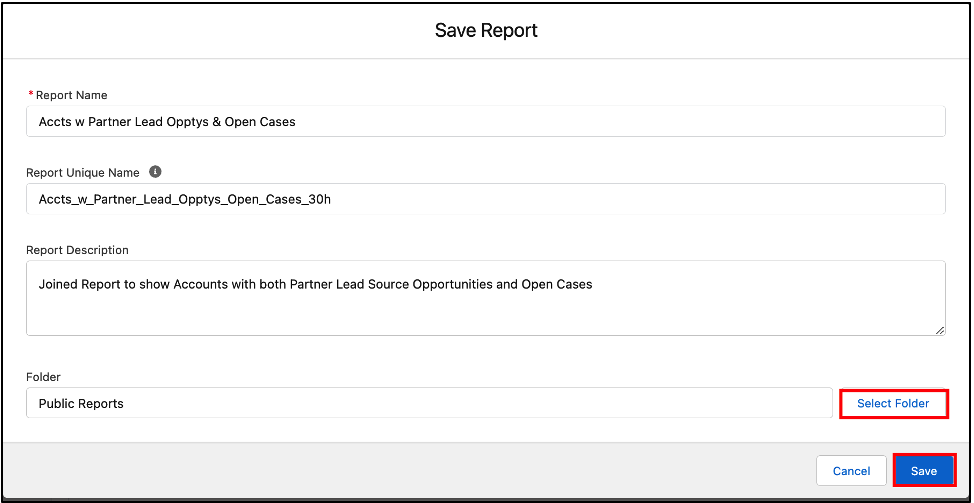
- To save the report, we need to name it and decide where to store it. Enter the below information for the report:
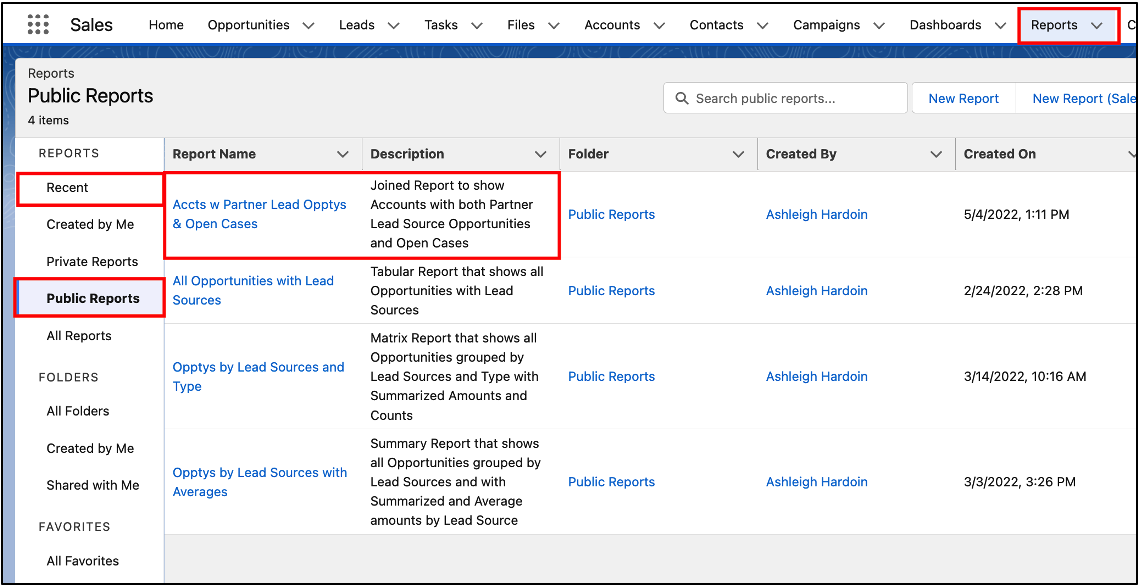
- Report Name: Accts with Partner Lead Opptys & Open Cases
- Report Unique Name: Either enter a unique name or tap the Tab button on your keyboard while the cursor is in the Report Name textbox to have Salesforce generate a unique name for you
- Report Description: Joined Report to show Accounts with both Partner Lead Source Opportunities and Open Cases
- Click Select Folder to select the Public Report folder to store this report, and then click Save.
- To go back to our saved report, navigate to the Reports tab again. The report can be viewed in either the default “Recent” reports list or by clicking on the “Public Reports” list.
Salesforce Joined Reports are extremely useful when we need to analyze data that can’t be captured in an individual report type. However, it’s important to remember that the blocks of a Joined Report need to have one or more objects in common to be added to the same report.
Start at the beginning of the blog post series with “Reporting pt. 1: Report Types and Formats.” Or continue learning about Salesforce Reporting in the next post, “Reporting pt. 6:Bucket Fields.”
Additional Report Information:
- Beginning of the reporting blog series: Reporting pt. 1: Report Types and Formats
- Previous reporting blog: Reporting pt. 4: Matrix Reports
- Next reporting blog: Reporting pt. 6: Bucket Fields
- Trailhead by Salesforce: Reports & Dashboards for Lightning Experience Trailhead Module
- Trailhead by Salesforce: Reports & Dashboards for Classic Trailhead Module
- Salesforce Help: Reports
Cover Photo by Shoeib Abolhassani on Unsplash


