
In previous posts for this reporting series, we learned about Report Types and Formats. Today, we will be creating Bucket Fields, also known as Bucket Columns, in Salesforce.
What is a Bucket Field?
In Salesforce, a Bucket Field is a report feature that allows users to quickly categorize data in a report into segments or “buckets.” Using buckets instead of creating custom fields for quick segmentation of data allows end users to categorize data without involving Admins. This also allows users to avoid creating fields that would only be used for reporting purposes. For example, if a company had an internal designation for Opportunities, such as “Small, Medium, or Large” that was based on the Opportunity Amount, we wouldn’t necessarily need this information captured on every Opportunity. However, it would be useful information to see when we want to see how many Opportunities are in the pipeline that are Small, Medium, or Large.
Considerations
Bucket Fields are extremely useful for categorizing data in Salesforce reports, but they do have some limitations. Salesforce Help provides some items to consider when using Bucket Fields in reports:
- Each report can include up to 5 bucket fields.
- Each bucket field can contain up to 20 buckets.
- Each bucket can contain up to 20 values.
- Bucket columns are available for use only in the report where they’re generated. To use a bucket in multiple reports, create the bucket column for each report. Or create a separate formula field for the object that’s dependent on the bucket.
- Buckets and bucket fields aren’t available for reports that include external objects.
- If a bucket column’s source column has a custom index, and you filter by the bucket column, then the custom index performance gains are lost.
- If a bucket column has a filter on it, modifying the values in the buckets removes any filters that refer to the bucket column.
- Bucket columns don’t support picklist values that contain a tab character.
How to Create Bucket Fields
Note: To follow along with the steps below, use or create a Playground from Salesforce Trailhead or a Developer Edition org.
To learn how to create Bucket Fields in Salesforce, we will create a Bucket Field for the example explained in the “What is a Bucket Field?” section above. We’re going to create Small, Medium, and Large buckets based off of Opportunity Amounts on a report of Open Opportunities.
- In Salesforce, navigate to the Reports tab, and click New Report

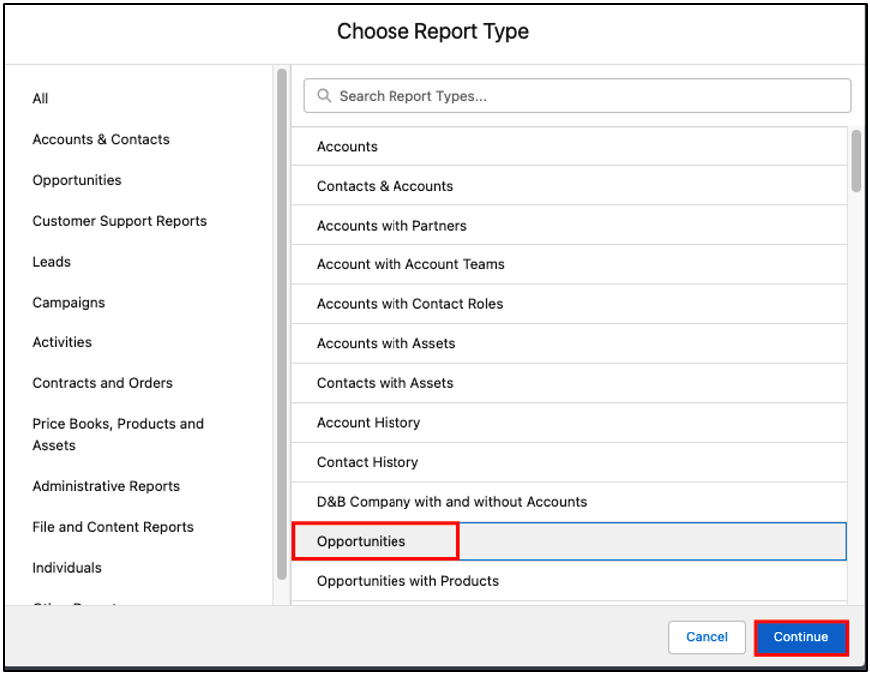
- Select the Opportunities Report Type, and click Continue.
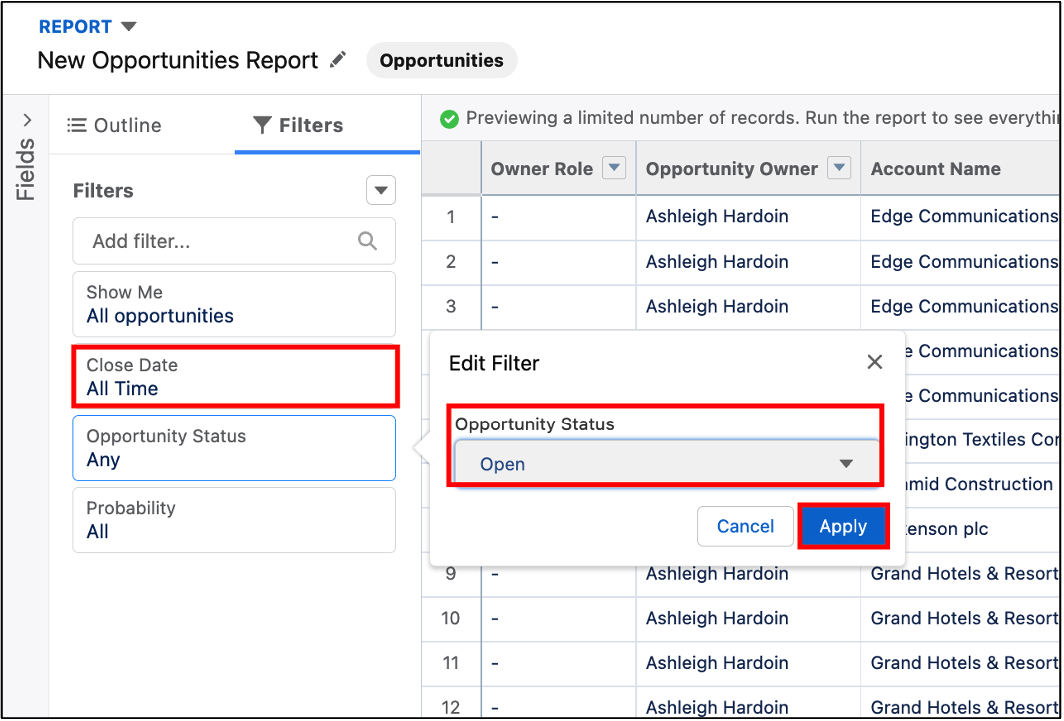
- Select the Filters tab at the top of the report to filter results for Open Opportunities. Click on the Close Date filter, update the Range to All Time, and click Apply. Click on the Opportunity Status filter, update the status to Open, and click Apply.
- To simplify the information in the report, select the Outline tab at the top of the report. Next, remove all columns, except the ones listed below, by clicking the X next to the column name. Then drag and drop columns to the below order:
- Account Name
- Opportunity Name
- Stage
- Close Date
- Amount.

Add a Bucket Field (aka Bucket Column)
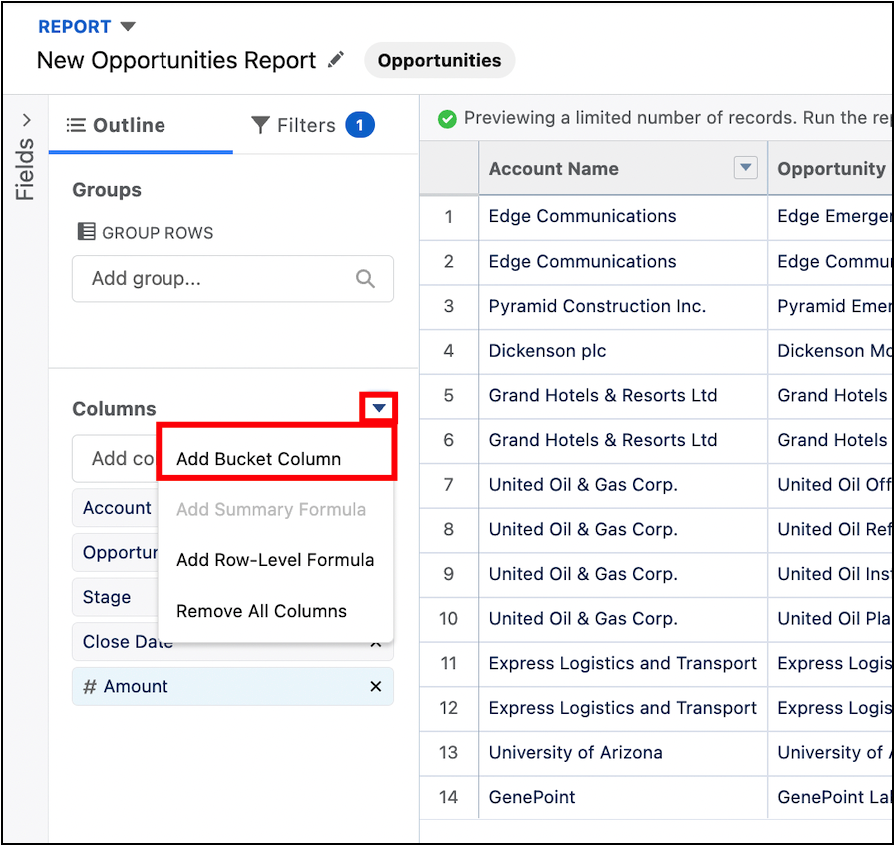
- Now, let’s create the Bucket Field in the Salesforce report. Click on the drop-down arrow in the Columns header, and select Add Bucket Column.
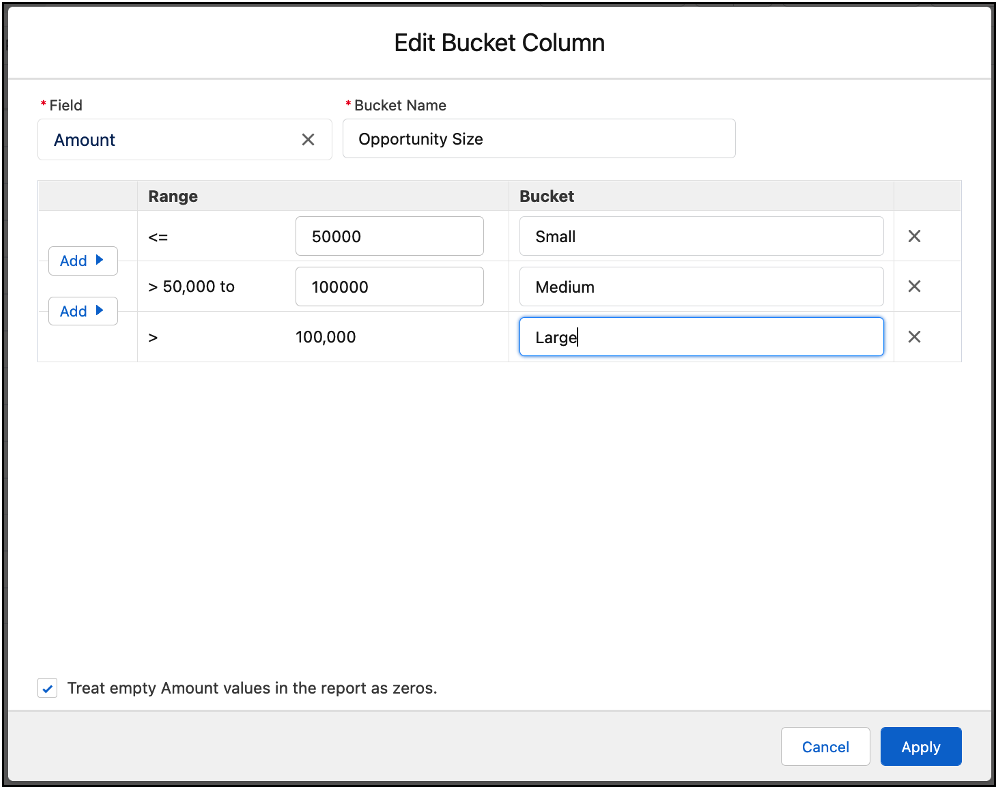
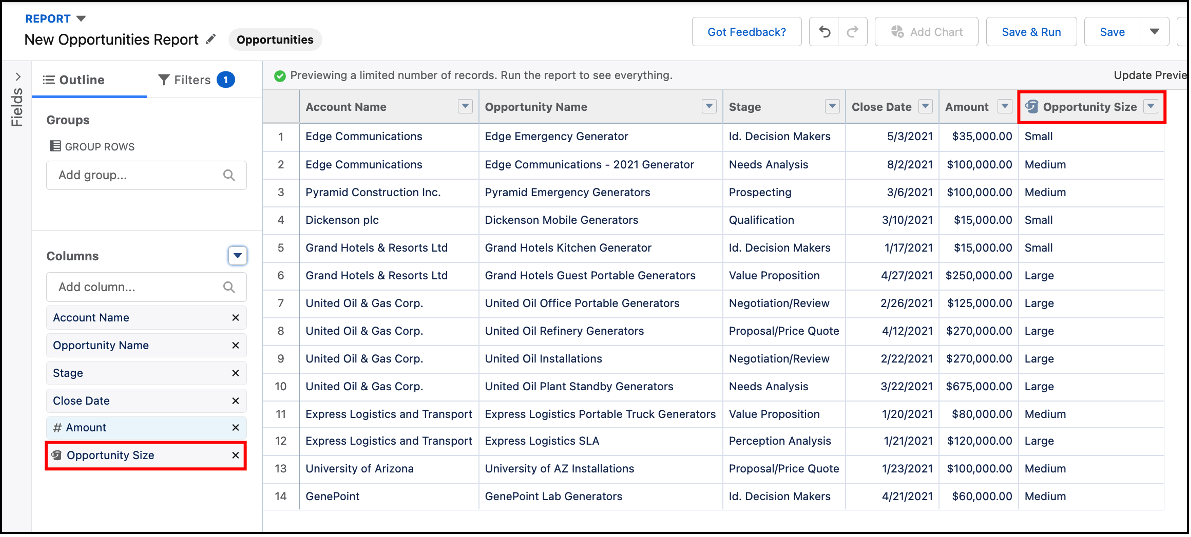
- Select Amount as the Field for the Bucket Column – this means that we’ll be basing the Bucket Field off the Opportunity Amount. Enter Opportunity Size for the Bucket Name, and click the Add button in the first column of the table to add a third bucket.
- For the bucket values, enter the below information:
Range Value to enter Bucket Value to enter <= 50000 Small > 50,000 to 100000 Medium > Large - Then click Apply.
- Now the Opportunity Size buckets we just created are visible in the Report preview.
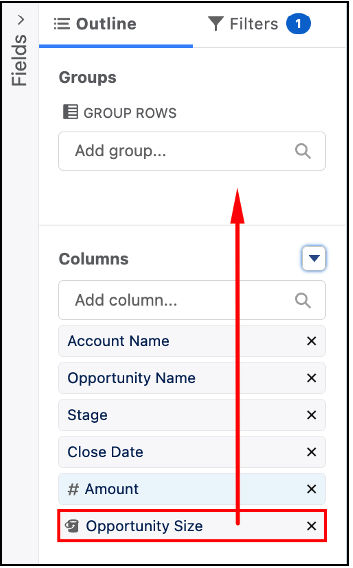
- In the report Outline, drag and drop the Opportunity Size to the Group Rows section to create groups based on the sizes.
Save the Report
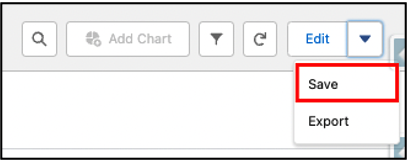
- In the top right corner of the report, click Save
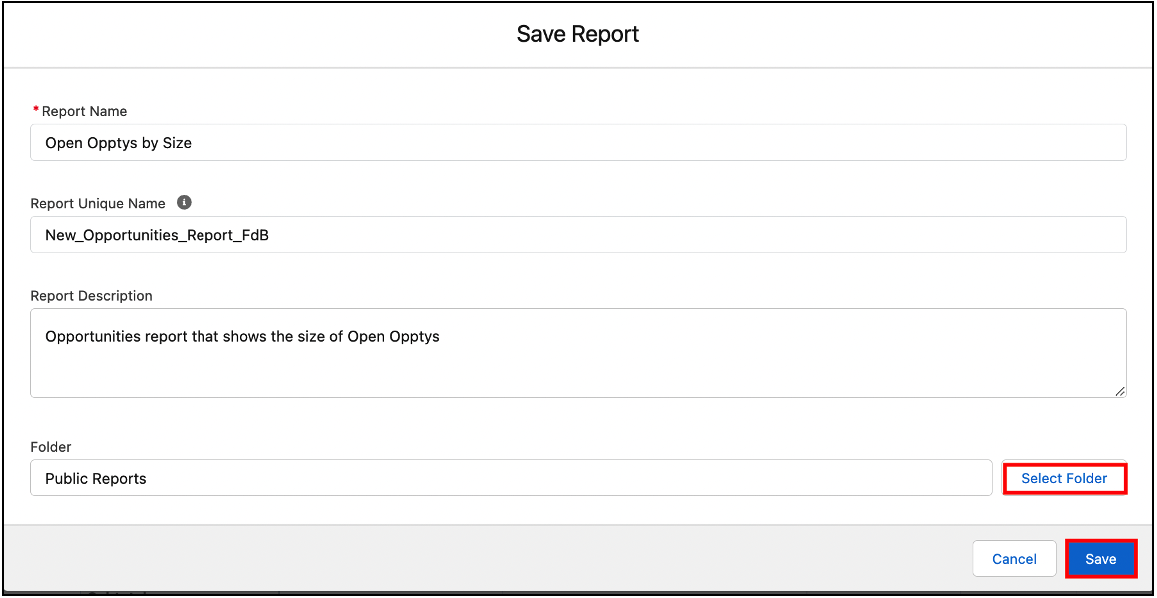
- To save the report, we need to name it and decide where to store it. We’ll enter the below information for the report:
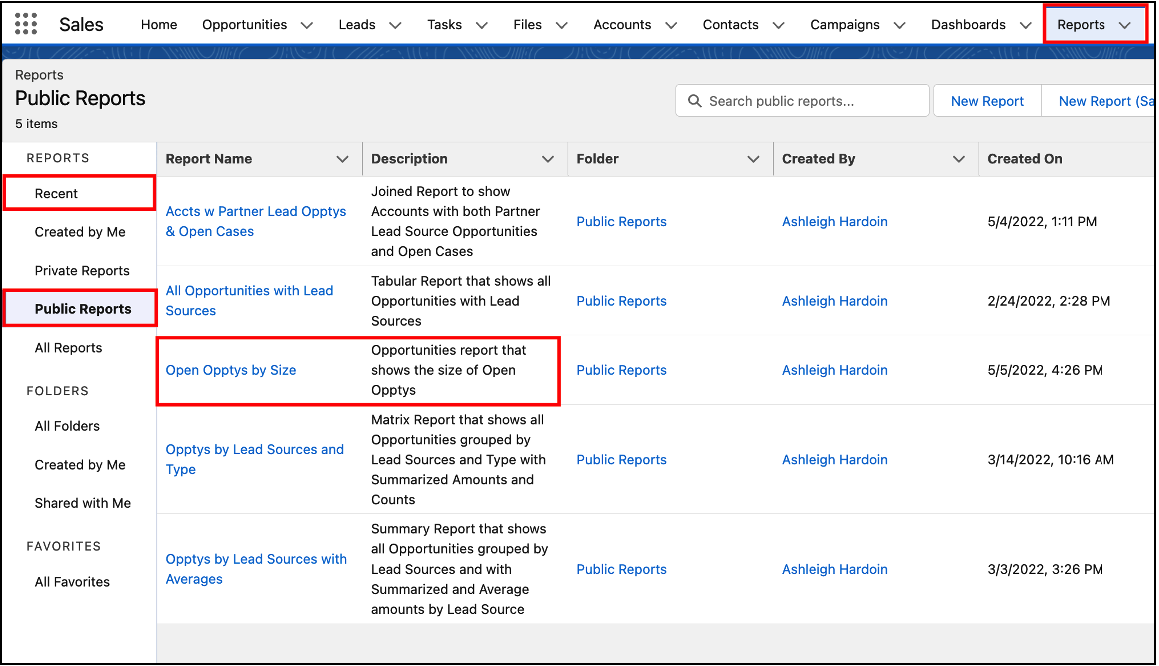
- Report Name: Open Opptys by Size
- Report Unique Name: Either enter a unique name or tap the Tab button on your keyboard while the cursor is in the Report Name textbox to have Salesforce generate a unique name for you
- Report Description: Opportunities report that shows the size of Open Opptys
- Click Select Folder to select the Public Report folder to store this report, and then click Save.
- To go back to our saved report, navigate to the Reports tab again. The report can be viewed in either the default “Recent” reports list or by clicking on the “Public Reports” list.
Bucket Fields are extremely useful to categorize and segment data in reports, and are ideal solutions when we don’t need to use the same bucket on a large number of reports.
Start at the beginning of the blog post series with “Reporting pt. 1: Report Types and Formats.” Or continue learning about Salesforce Reporting in the next post, “Reporting pt. 7: Add a Chart to a Report” (coming soon!)
Additional Resources:
- Beginning of the reporting blog series: Reporting pt. 1: Report Types and Formats
- Previous reporting blog: Reporting pt. 5: Joined Reports
- Next reporting blog: Reporting pt. 7: Add a Chart to a Report (coming soon!)
- Salesforce Help: Add a Bucket Column
- Salesforce Help: Categorize Data with Bucket Columns
Cover Photo by Sixteen Miles Out on Unsplash