
Deployment in Boomi
Deployment is when you prepare your processes and deployable components to run and operate in a test or production environment. To deploy an Order component or process, you must first create a packaged component version for it.
Deploy a package from:
- Packaged Components page from the Actions menu of a specific packaged component.
- Package Components page at the completion of the Create Packaged Components wizard
- Deployments page using the Deploy Packaged Components wizard
Deploying to a different environment
Before you begin:
- The Packaged Component Deployment privilege to perform this task.
- Components must be created into a packaged component before they can be deployed.
- Deploy a packaged component on the Packaged Components page. And build a page or the Deployment Procedure.
Deployment Steps:
- Select Deployments the Deployments landing page opens from the deploy menu.
- The Deploy wizard opens from the Click the Deploy Packaged Component button.
- Optionally add notes about the deployment that you may want to reference later. From the available options select an environment from the Deployment Environment field.
- Click on Next: Select Versions. The Deploy: Select Packaged Components screen of the Deployments wizard opens.
- Select the check box next to one or more packaged components that you wish to deploy to the environment that you selected in Step 3. From the Component Explorer.
- Optional: Use Action menu to compare two versions of a packaged component, or to deselect the component as a candidate for deployment.
- Optional: Click the View Details link in the Selected Version column to view details about the version of the packaged component that is currently selected. If applicable, Click View Details link in Deployed Version column to view details about another version that was most recently deployed.
Press Close in the Package Component Details dialogs to return to the Deployment wizard. - Optional: Click the Select different package link to select a different version of the packaged component in which to deploy. Select a different version of the packaged component to mark it instead as the candidate for deployment and click Select Package, and press Cancel to return to the Deployments wizard.
- Click the Next: Review button. The review screen of the Deployments wizard opens.
- Click the Deploy button to Review and confirm that all selections and details are correct, then The Deployment Successful dialog appears and informs you that your recent deployment was successful.
- In the Deployments table click View Deployments to see only your recent deployment or then click Close to see all deployments.
Deployment in Celigo
Moving flows from sandbox environment into the Production environment You need a clone tile that can move flow from one integration tile to another integration tile within the same or different environments with one store at a time. While modifying a duplicate version of it. integration unchanged Or Cloning allows you to keep the original flow.
Clone an integration
- Make sure you’re in the environment from which you’d like to clone an integration.
- On the Home page, go to the integration.
- Based on the integration view you use, follow the steps given below
- select Clone integration to Click the overflow (…) menu in the upper-right corner of the tile and
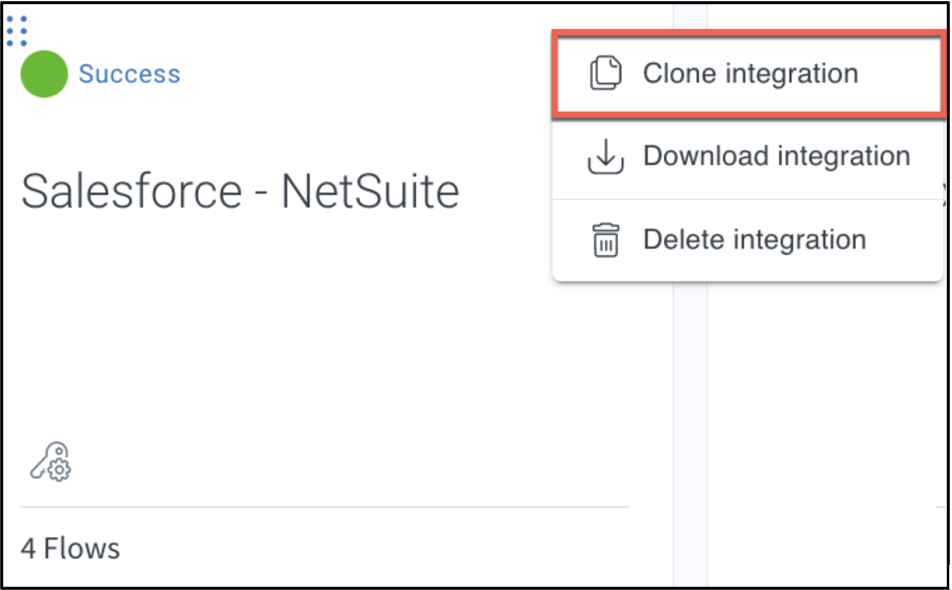
- Select Clone integration from the Actions column, from the overflow (…) menu

- The Clone integration page opens.
- Enter the details On the Clone integration page,
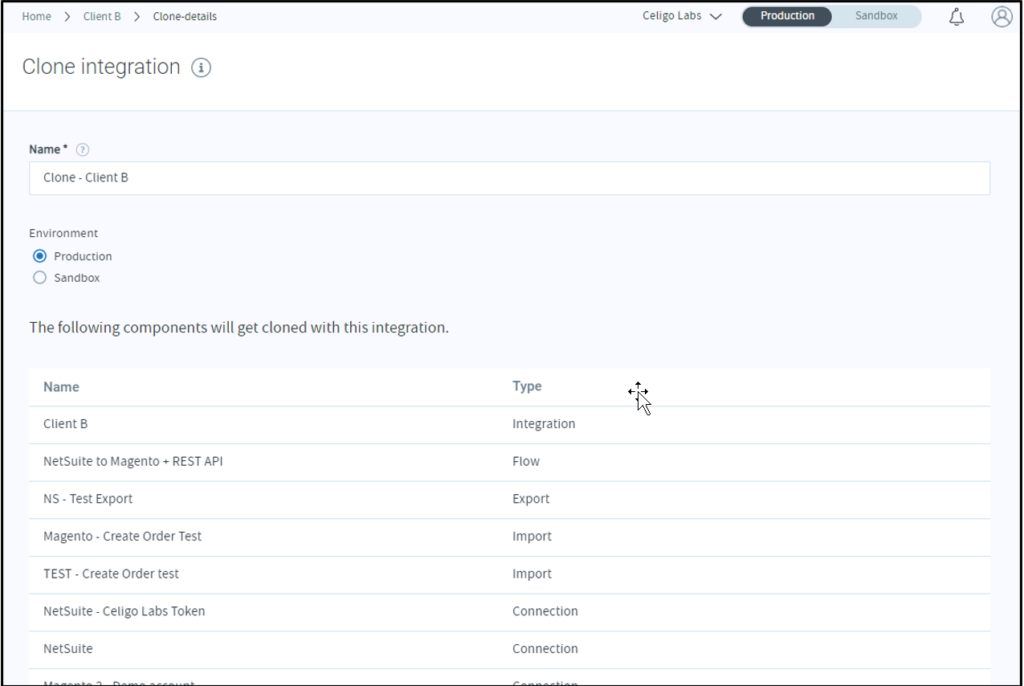
- Name: You can always rename your integration tile or flow outside of the cloning process.
- Enter a unique name for the clone. Select Production or Sandbox for the resulting clone.
- Make sure that it is unique enough that you can identify it later.
- Within the new integration. Review the list of all cloned items contained
- Click Clone integration, At the bottom of the list of cloned integration components.
Configure the cloned integration
First, configure the connections to each app. Because connections are not copied into the cloned integration.
Clone a flow
- First Open the integration tile that contains the flow you want to clone.
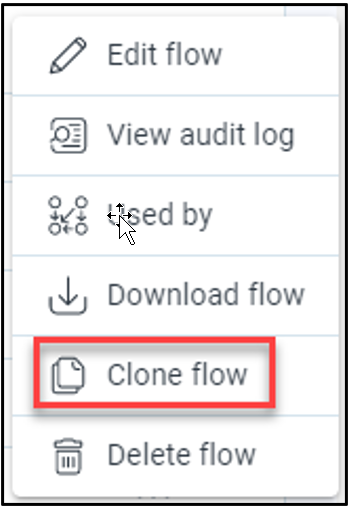
The Clone flow page opens. - Enter details in the Clone flow page.
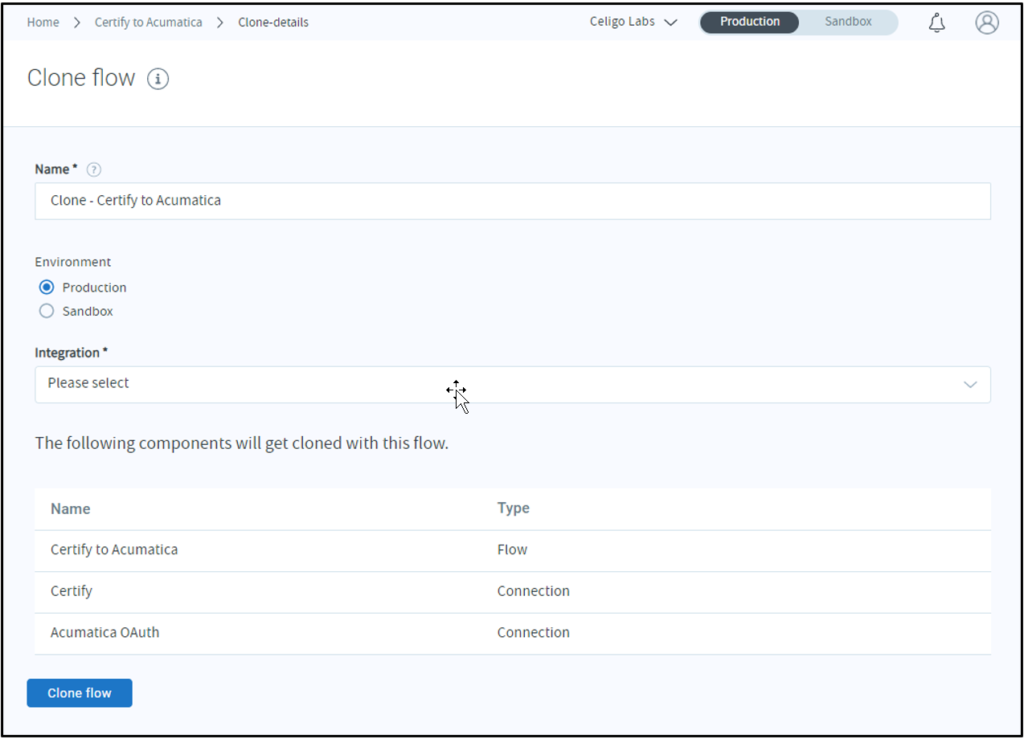
- Name: Enter a unique name for the clone.
- Environment: Select Production or Sandbox radio button.
- Integration: You can also move a flow into an integration after cloning the flow.
Select an option for Standalone flows. After that select the integration tile where you want to save the cloned flow into. Flow group: Select a group for the cloned flow, or leave it set to Unassigned. - Groups to organize flows. this option appears in the Integration which you selected currently.
- Review all the components which are included in the duplicate flow.
- Click on Clone flow at the bottom of the list of cloned flow components
Configure the cloned flow
While using clone flow connections are not copied, so you’ll need to configure the connections for any app connectors.
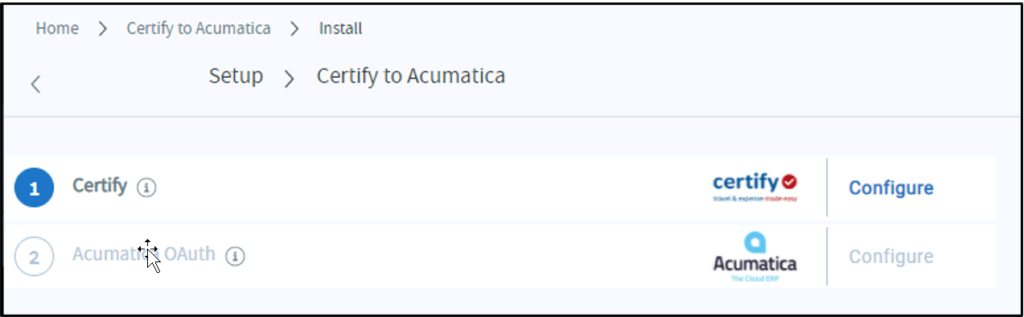
Once you’ve successfully configured your connections, then the cloned data flow is stored in the integration tile you selected while cloning.
Cover Image by Freepik